About Authorization Code Grant
In the Authorization Code grant, the client first retrieves an Authorization Code from the OAuth Server. The client can exchange this code for an access token and a refresh token. The access token can be used to access the Rest API. The refresh token can be used to retrieve a new access token without any further user interaction.
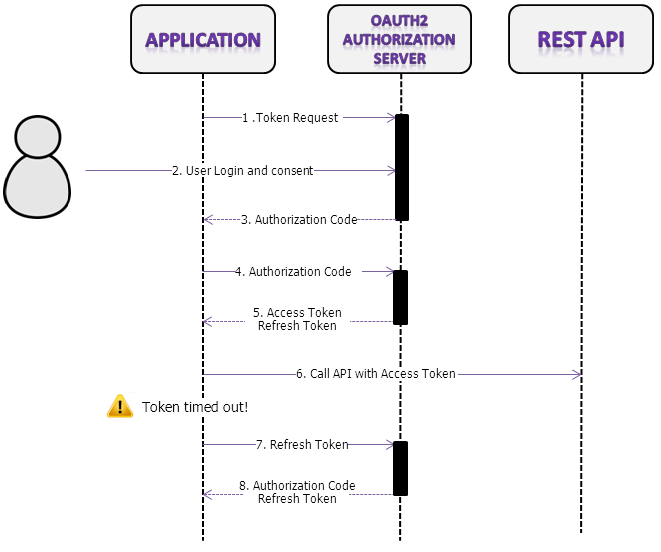
High-Level Flow
Below is a high-level flowchart for the Authorization Code grant type:
Used Tokens
Each of the different token types defined by OAuth 2.0 serves a distinct purpose in the protocol. Here is a short overview of all the tokens that are used in Oauth 2.0:
An authorization code is a short-lived token representing the user's access grant, created by the authorization server and passed to the client application via the browser. The client application sends the authorization code to the authorization server to obtain an access token and, optionally, a refresh token.
The access token is used by the client to make authenticated requests on behalf of the end user. It has a longer lifetime than the authorization code, typically on the order of minutes or hours. When the access token expires, attempts to use it will fail, and a new access token must be obtained via a refresh token.
The refresh token may have an indefinite lifetime, persisting until explicitly revoked by the end-user. The client application can store the refresh token, using it to periodically obtain fresh access tokens, but should be careful to protect it against unauthorized access, since, like a password, it can be repeatedly used to gain access to the resource server.
Detailed Flow
All applications follow the same basic pattern when accessing the Qeo Rest API using OAuth 2.0. At a high level, using OAuth 2.0 to access the Qeo Rest API consists of these general steps, the numbers between brackets corresponding with the steps of the OAuth 2 process in the diagram above:
- Register the application (done once) (refer to Step 1 below)
- Obtain an authorization code from the OAuth 2 Authorization server:
- Token request to the server (1)
- User login and consent (2)
- Return of Authorization token by the server (3)
- Obtain an access token from the OAuth 2 Authorization server:
- Present authorization code to the server (4)
- Receive access token and refresh token (5)
- Provide the access token to the Qeo Rest API (6)
- Refresh the access token:
- Send refresh token to OAuth 2 Authorization server
- Get new authorization token from the server
Step 1: Register your Application
This needs to be done only once. All applications that want to access the Qeo Rest API must be registered first. Currently registering your application is done by email (partnersalliancesupport@technicolor.com). In addition of a contact person and email, you will have to provide us the following information about your application:
| Value | Description |
|---|---|
| application_name | A user friendly way of representing your application to the user. |
| redirect_URI (1) | After authenticating the Oauth 2.0 Security Server, the browser of the user will be redirected to a URL. This URL must match the redirect_uri received by the registration process. |
You will get your personal client_id and client_secret that you can use inside your application:
| Value | Description |
|---|---|
| client_id | A unique identifier for your application. This is considered as public information and must be provided in the URL when accessing the Oauth 2.0 Security Server. |
| client_secret | A client secret to authenticate your application against the OAuth server. |
Step 2: Obtain an authorization code from the Oauth2 Authorization Server
Before your application can access the Qeo Rest API, it must obtain an access token that grants access to that API. A single access token may grant varying degrees of access to multiple APIs.
To obtain an access token, the user needs to be redirected to the authorization endpoint of the Security Management Server. This URL will present the user with a default OpenID selection page. The exact URL of this endpoint can be discovered in the Qeo Root Resource of the server, under "oauth" > "authorization" > "href".
Your application must provide the following parameters:
| Parameter | Value | Description |
|---|---|---|
| response_type | code | Indicates that the response will be an authorization code. |
| client_id | The client ID obtained from the previous step | Indicates the client that is making the request. The value passed in this parameter must exactly match the client ID received in step 1. |
| redirect_uri | The redirect URI obtained from the previous step | Determines where the response is sent. The value of this parameter must exactly match the redirect uri from step 1 (including the http or https schemes, case, and trailing '/'). |
In addition to the mandatory OAuth parameters, the authorization request can contain the OpenID selection parameter. If provided, the default OpenID selection page won't be displayed. Instead the user will directly be redirected to the selected OpenId provider.
| Paremeter | Value | Description |
|---|---|---|
| opIdentifier | The discovery URL of the OpenID identifier. | This can be any OpenID 2.0 compliant provider. |
The user will be redirected to a login page requesting the credentials of the user. Once the user has filled in his credentials, his browser will be redirected to the redirect_uri. The url where it is redirected to also gets a query string in its url containing an authorization code.
Step 3: Obtain an access token from the Oauth2 Authorization Server
We can now do a request to exchange the authorization code for a access token. This is done if the application makes a POST request to the token endpoint. The exact URL of this endpoint can be discovered in the Qeo Root Resource of the server, under "oauth" > "token" > "href".
Your application must provide the following parameters:
| Parameter | Value | Description |
|---|---|---|
| grant_type | authorization_code | Indicates the grant type that is used. This needs to be set to convert the authorization code into an access token. |
| code | The code that was included in the redirect Url | The authorization code returned from the initial request in step 2. |
| client_id | The client ID | See step 1. |
| client_secret | The client secret | See step 1. |
| redirect_uri | The redirect URI | See step 1. |
The result of this POST request will contain a JSON string containing the following Fields:
| Field | Description |
|---|---|
| access_token | The token that can be sent to the Qeo Rest API |
| expires_in | The remaining lifetime on the access token. This is set on 3600 seconds by default. |
| refresh_token | A token that may be used to obtain a new access token. |
You now have a valid access token and a refresh token.
Step 4: Provide the Access Token to the Qeo Rest API
After your application has obtained an access token, it can access the Qeo Rest API by including it in an Authorization: Bearer HTTP header.
Step 5: Refresh the Access Token
Access tokens have a limited lifetime and, in some cases, an application needs access to our Rest API beyond the lifetime of a single access token. When this is the case, your application can obtain what is called a refresh token. A refresh token allows your application to obtain new access tokens. Currently, tokens expire in 1 hour.
To request a new access token you will again have to send a POST request to the access token endpoint but this time with the following parameters:
| Parameter | Value | Description |
|---|---|---|
| grant_type | refresh_token | Indicates that the token endpoint needs to convert a refresh token to a new access token. |
| refresh_token | the current refresh token | The refresh token returned from the initial request in step 2. |
| client_id | the client ID | The client ID obtained from step 1. |
| client_secret | the client secret | The client secret obtained in step 1. |
| redirect_uri | the redirect URI | The redirect URI obtained in step 1. |
You will then again receive a access_token, refresh_token and expires_in parameter.
Example
A company named Example.org wants to create their own web application for managing their Qeo Realms.
They must first send an email to partnersalliancesupport@technicolor.com with the following information:
application_name: Example Qeo Web
redirect_URI:  http://qeo.example.org
This means that the Security Server will only redirect to URLs starting with http://qeo.example.org. For example http://qeo.example.org/index.php will do, but http://www.example.org/ will not.After the application is approved they receive a mail from Technicolor, containing:
client_id: 2Xc6zKMNu2R3nuK6DQfho6be2F4U6M3m
client_secret: Nq397Y7n563r9ugp5m2O9LP3s01U8Dx8
Now they can start building their web application. The first step is to add a link to the authorization endpoint providing the necessary client_id and redirect_uri:
<a href="https://my.qeo.org/qeo-rest-security/oauth/authorize?response_type=code&client_id=2Xc6zKMNu2R3nuK6DQfho6be2F4U6M3m&redirect_uri=http://qeo.example.org">Click here to login!</a>
When the user clicks this link the browser is redirected to a Google login page asking the user to login with his Google credentials. This information is NEVER given to the web application, which is the main advantage of using OpenID/OAuth2.0 for authentication. If it is the first time that the user is logged in this application he is asked whether he wants to trust this application. If the user clicks Accept he is redirected to:
http://qeo.example.org/?code=b02ca9907f0c15c60a18379f5385ee3672ff0f5d%7C1370942397177
On subsequent logins, this check is skipped since the application already has the trust information, and the user is redirected.
The web application located at http://qeo.example.org will be able to fetch the GET parameters from the request and extract the authorization code. As described above, this will not be enough to start doing calls to the Qeo Rest API. We first need to exchange the authorization code to an access_token. This is done by doing a POST request to the /token endpoint:
POST /oauth/token HTTP/1.1
Host: my.qeo.org
Content-Type: application/x-www-form-urlencoded
grant_type=authorization_code&code=b02ca9907f0c15c60a18379f5385ee3672ff0f5d%7C1370942397177&client_id=2Xc6zKMNu2R3nuK6DQfho6be2F4U6M3m&client_secret=Nq397Y7n563r9ugp5m2O9LP3s01U8Dx8&redirect_uri=http://qeo.example.org
This results in the following JSON response:
{
   "access_token":"2YotnFZFEjr1zCsicMWpAA",
   "expires_in":3600,
   "refresh_token":"tGzv3JOkF0XG5Qx2TlKWIA",
}
Now the qeo.example.org application finally has an access_token that can be used for accessing the Qeo Rest API. For example if the application wants to display all Realms belonging to the user it will send a GET request containing the access_token in its header:
GET /v1/realms HTTP/1.1
Authorization: Bearer 2YotnFZFEjr1zCsicMWpAA
Host: my.qeo.org
Note that the access_token that was provided in the JSON response is only valid for 3600 seconds. If the qeo.example.org application has a user which wants new information after that period, the application needs to do a POST request to the /token endpoint and provide the refresh_token to request a new access_token:
POST /oauth/token HTTP/1.1
Host: my.qeo.org
Content-Type: application/x-www-form-urlencoded
grant_type=refresh_token&refresh_token=tGzv3JOkF0XG5Qx2TlKWIA&client_id=2Xc6zKMNu2R3nuK6DQfho6be2F4U6M3m&client_secret=Nq397Y7n563r9ugp5m2O9LP3s01U8Dx8&redirect_uri=http://qeo.example.org
It again results in a JSON response containing a new access_token:
{
   "access_token":"2YotnFZFEjr1zCsicMWpAA",
   "expires_in":3600,
   "refresh_token":"tGzv3JOkF0XG5Qx2TlKWIA",
}